Level 3 : Working with Photographs

Tutorial 3-1 Introduction to Exposure
Tutorial 3-2 Correcting Image Exposure
Tutorial 3-3 The Basics of Color
Tutorial 3-4 Correcting Image Color
Tutorial 3-5 Increasing Sharpness
Tutorial 3-6 From Color to Black and White
Tutorial 3-7 Resizing and Cropping
Tutorial 3-8 Images for the Internet and Email
Tutorial 3-9 Correcting Lens Distortion
Tutorial 3-10 Adding a Soft Focus Effect
Tutorial 3-11 High Dynamic Range Images
Tutorial 3-12 Creating Panorama Compositions
Tutorial 3-13 Hand Coloring a B&W Photo

3-8 : Images for the Internet and Email

Intro
So you have your brand spanking new digital camera that takes great, huge photos - and you can't wait to show them off. So you take a photo of your dog and email to your best friend. The response is lukewarm. Why? Because you sent him a huge 10 meg file that's taking forever to download over his dial-up modem. After putting a stranglehold on his email for 30 minutes, it doesn't matter how great your photo is, your friend is going to block you from sending more.

Sound familiar? Maybe that's an exaggeration, but you need to know how to setup images for the internet. This tutorial will give you some guidelines on resizing and quality. Don't forget to watch the video at the bottom for more information.

Website Images
If you are working on images to go on a website, you have a few considerations. What is the purpose of the image? Is it to show off a product? An image with a transparent background? A photo of your cat for a blog? Each of these images have different requirements and you will have to make judgment calls that balance size and quality. You can't have a large image of great quality that will download quickly, but you can have a good image at a decent size that will.

JPG vs GIF
The two most common image formats on the internet are Jpg's (pronounced "Jay-Peg") and Gif's and they use color differently. As a rule, jpg's are used for photos. Gif's are used for animation, transparency and images with large blocks of colors.

Below is a table that shows how they work (and don't)

JPG

GIF

Jpg example Gif Example

51.2 KB (quality = 74)

37.9 KB (32 colors)

   
jpg example gif example

26.8 KB (quality = 40)

8.4 KB (32 colors)

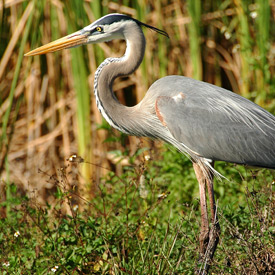
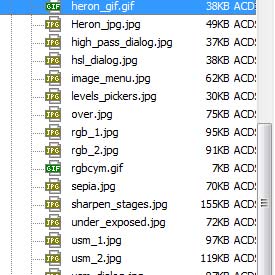
If you look at the bird (heron) at the top, you'll see that it looks good in the Jpg, but a little grainy in the Gif. That's because I saved it as a Gif with 32 colors out of a maximum of 256 for this example. Yes, you can only show 256 colors in a gif and that is it's major limitation. You'll also notice that the gif did a great job on displaying the text in the bottom images, while the jpg is not nearly as crisp. Almost all of the screenshots on this site are gifs, while the photos are images.

JPG's
Jpg's are an industry standard for images. Most cameras create jpg's when they make an image. Also, jpg's can vary greatly in quality.

Below are four jpg's save at different levels of quality.

Jpg example Gif Example

16.9 KB (quality = 10)

23.5 KB (quality = 30)

   
jpg example gif example

39.1 KB (quality = 60)

106.5 KB - (quality = 100)

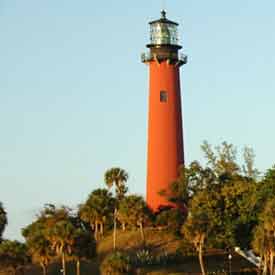
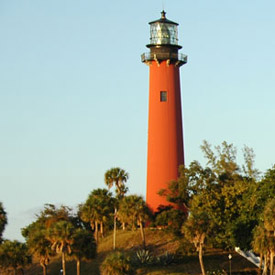
Now in this heron image, you don't see a lot difference - this goes back to my message that you should treat each image differently. Your goal for online displays is to keep your images as small as possible while retaining quality. Here are two final jpg's saved at differing qualities. Here you can see more a difference (especially around the top of the lighthouse).

11.7KB (quality = 15)

26.4KB (quality = 70)

If I'm saving an image for an online gallery, I'll save it at a very high quality. Yes, it will take longer to load, but I want to show my images at their best. Most viewers visiting will want to see better quality images and expect to wait a little longer. Of course, everyone has their limits.

If I am just posting an image on a blog to enhance the writing, I will use a file with a smaller files size. Visitors will want to read, and not wait for an image to download. You also have to think about how many images will be on a page - the total size could add up quickly.

Sometimes you have to post a big sharp image. In this case, it's a good idea to add a thumbnail (smaller image) on the page that links to the larger image.

GIF's
Now that you've seen how images saved as jpg's work, I'll show about gif's. Above you saw that I saved some text in both jpg and gif. The gif is smaller in file size and looks better. That is where gif's shine. Since there is very little variation in color, the gif can display the image with only 32 colors. It is smaller because of the way it interprets color. Below are four gif's saved at a range of colors. I've added a gray background so you can see the transparency.

Gif

10.8KB (colors = 8)

14.9KB (colors = 16)

   
gif gif

18.8KB (colors = 32)

28.5KB (colors = 128)

I'm sure you noticed that the Heron looks better the more colors you add, but did you also see how the screenshot improves as well (look at the area around 'Local View')? The transparency is added by deleting part of the image. As long as your image is not on the 'background' layer or flattened you'll be able to create a transparent section.

Creating an Online Photo Gallery

Special Note for CS4 - Before we continue, you need to check to see if the Web Photo Gallery was included when you installed CS4 (this is automatic with earlier versions. Navigate to File > Automate > Web Photo Gallery - if you see it, continue. If you don't then you need to download the optional plug-in package from Adobe.

Photoshop has a great tool for creating a gallery of images you can post on your website. It is an automated process that creates the HTML pages and resizes your images - all in a matter of minutes. The only limitation is in the size of the images in the galleries. You can always customize the pages after the album is made (if you have the power).

I'm not going to go in great detail on this because there are so many options. To start the process, navigate to File > Automate > Web Photo Gallery. When you do this, you'll see a dialog box pop up.

Photoshop Web Gallery

In the image above, I have highlighted two areas. These options offer the most variation. You can select from a number of styles, or templates. The Options droplist allows to make changes to the style you have selected. You also need to select the Source folder (where your original images are stored) and the Destination folder (where you want the gallery to be saved).

If you have a number of images on your drive, play around with the various options and find a style that you like.

Remember, if you are using an image on a web pages, resize it to the size that it will be used at on the page (save the original). If you put a 3000x2000 pixel image on your site and then force it to be 300x200, you will still have to load the large image and it will slow down your page. You'll often see this when people have a number of large images on a page, but they appear to be small - what a pain in the butt to have to wait!

Email
When it comes to email, it's a good idea to keep your images below 100k unless your recipient is expecting a large file from you. Most of the time your image shouldn't be more than 800-900 pixels wide. Any wider and the viewer may have to scroll to see it all. You can also post your image on the net and send a link to the full size image if they want to see more detail.

Use the same guidelines as above, as far as quality goes.


Conclusion
The internet is an amazing tool. Just remember that you are not the only one on it or the only one viewing your images. Be considerate of viewers that still on dial up (like my brother). Acknowledge that your friends don't necessarily need to see 12 photos of your cat (when only 1 will do). Know when to save as a gif (which normally has a smaller file size for graphics) , and when to save as a jpg (which has a better image quality for photos because it has more color).

Reference
Learn more than you'll ever need to know about JPG's and GIF's on Wikipedia
Download a Download Time Calculator

The video content presented here requires JavaScript to be enabled and the latest version of the Adobe Flash Player. If you are using a browser with JavaScript disabled please enable it now. Otherwise, please update your version of the free Adobe Flash Player by downloading here.


<< Previous Tutorial

Return to List

Next Tutorial >>

Owned and operated by The Art Department, Chester, NE
This web site is protected by Copyright 2008 - 2017 ©

Last Update:


Please visit our other sites:

| www.myARTdepartment.com | www.TheCenterofCreativity.com | CustomGamingDesign.com | FreeAutoCADTutorials.com |

myIllustratorsite.com | myAfterEffectssite.com | myAutoCADsite.com