ZEN CART
INSTRUCTIONS FOR ADDING PRODUCTS & CATEGORIES
ADDING ATTRIBUTES TO PRODUCTS
When creating your catalog, you'll find that you might want to add options to your products. For example, you could create separate products for a red shirt, a blue shirt and green shirt - or - you could create one product with attributes for red, blue and green.
Using attributes will help you keep your catalog manageable, as well as show your customers what options they can pick without having to search the whole site just to find the same shirt in a different color.
In Zen Cart, options are called attributes. The best part is that you can define the attribute (Option Name) and the varieties within the attribute (Option Value). How you set these up is your choice, and Zen Cart is quite flexible for you.
I would recommend that you write down a list of what attributes you think you will be using in your catalog and create them in one session. This will help you get organized and save you some time with data entry.
Zen Cart has 3 modules to help you with this:
Option Name Manager: (color, size, etc)
Option Value Manager: (red, blue, small, medium, etc)
Attribute Controller: (Attaches options to the products)
OPTION NAMES
Start with the Option Name Manager by navigating the menu to Catalog>Option Name Manager you'll see this screen:
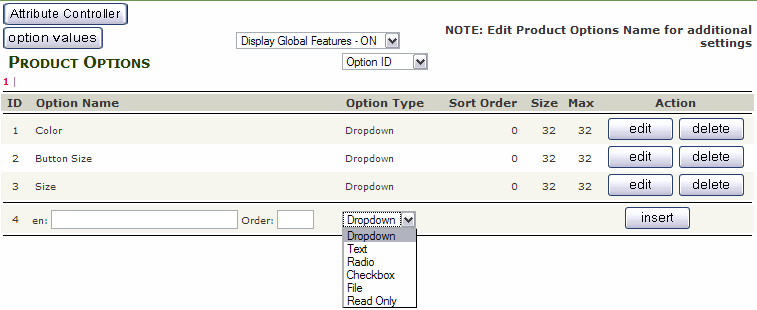
In this example, some have already been added, but on line 4, a new option can be added. You can also enter a Sort Order. You can also select the method that the customer will use to select the option value. Using a Droplist is an easy way to provide the list, while not taking up a lot of screen space. Once you have the Name, Order and Type, press ![]() .
.
You might it easier to organize if you create Option Names like "Shirt Size" or "Shirt Color" so that you can be more specific to the products. Adding more detail and flexibility is always a good plan.
This page has a lot of other info on it, but for now, just ignore it.
OPTION VALUES
Now that you have created an Option Name, you can add Option Values to it. Navigate to Catalog>Option Values for this screen:
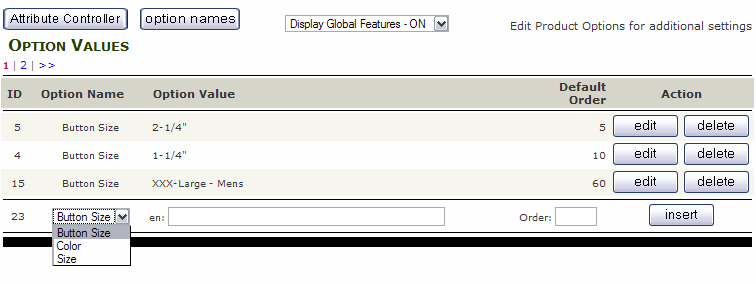
The focus on this page is the drop list at the bottom of the list. Select the Option Name that you want to add a value to, then enter the Value. Then enter the (sort) Order and press ![]() .
.
You might not see it appear in the list, but notice that there can be more than one page of values.
Now you have created your Option Names and Option Values, you can start adding them to your products.
ATTRIBUTE CONTROLLER
Now you have created your Option Names and Option Values, you can start adding them to your products. This is the job of the Attribute Controller.
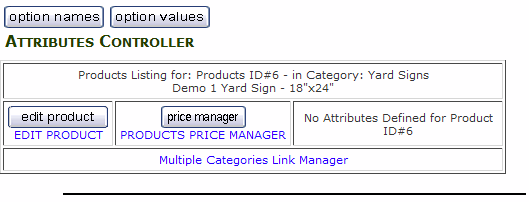
Navigate to Catalog> Attribute Controller.

Note that you can still access the Option Names and Option Values pages from here.
Select the category that you want to work with from the droplist. Note that categories containing products are marked with an asterisk.
Select a category to work with, and you'll see the screen change. At the top is this section:
You will see that you can go to other screens, but skip past this and look further down:
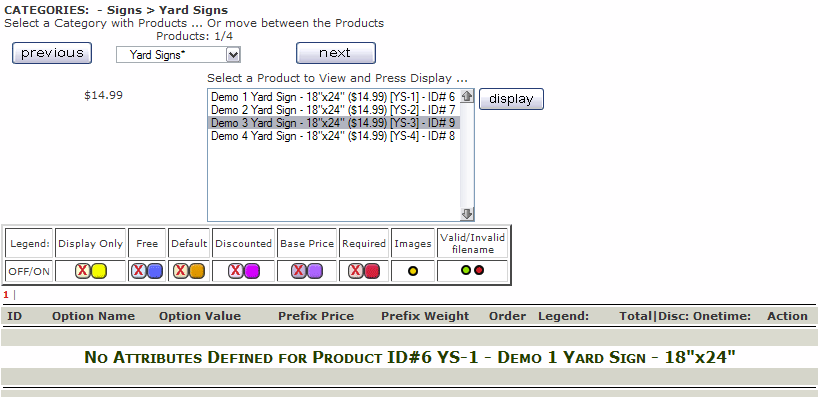
Once again, you can select your category and you will see a list of products. Select a product from the list and then scroll down:

Ok, there's a lot to look at here, but in most cases, you can just select the Option Name, then select one or more Option Values. To select more than one Option Value, hold down the CTRL key and select the Option Values that you need for the product.
If all you are doing is adding the options, you can press the ![]() button. This will add the options to the product, which you can then check in the store.
button. This will add the options to the product, which you can then check in the store.
Sometimes, you might want to add a surcharge for some options (example: +$2 for XXL shirts, or +$5 for reflective vinyl, or -$3 for a clearance color option). If that is the case, select the Option Name(s) and enter the surcharge in the Price box. The same concept applies to the Weight boxes (calculated for shipping).
Certain items like vinyl color may require a color sample (swatch) to let the customer know what shade or hue they are ordering. If you need to add an image, you can select an individual Option Name then select and image from your computer in the "Attributes Image Swatch" text field (remember to select the correct directory). Zen Cart will use this swatch only for this item. This is handy, because you have a separate swatch for "red" vinyl and separate swatch for "red" shirts.
Once you have added your Options, they will be listed on the page:

Here you can delete the Option Name, or individual Option Values. Click the ![]() button to make changes to individual Option Values.
button to make changes to individual Option Values.
This is written to be an introduction to the most common uses of Attributes and Options. As you saw, there are several other options at your disposal, but what's covered here will help with most products.
<< PRODUCTS 2
EDITING PRODUCTS >>
© 2011 - Art Whitton - myArtdepartment.com